3D Printing has been fun, and it still is. I’ve started a little business that keeps things interesting printing things for clients – even though its not profitable at all. But it did get me interested in a new hobby: FPV Drone flying / racing.
A long long time ago, in a life-time far away, I bought a real RC Helecopter . The blade-span was at least a yard and it used some kind of highly toxic flammable fuel to run it (ah, those were the days). It was a beast and impossible to fly (at least for me). After crashing it multiple times, and having a sheared blade fly into my shoulder – missing my neck by inches (yes, I used the Imperial System back then), I gave up and sold it. I still have the scar.
Then a few years back I bought a mini, palm sized helicopter with the tail blade (not the counter-rotating main blades), and while it was less dangerous to fly (didn’t have to worry about it slicing my head off), it still was virtually impossible to control.
Now, a few months back, I met some people through my 3D Printing business that wanted custom FPV Drone racing parts. After working with them and designing/printing parts, I got hooked again. This time its a little different. The drones are still hard to fly, but they’ve got a whole lot more intelligence built in: gyros, motion sensors, level sensors, battery sensors, and some with GPS and barometers. And with all that you get different flight modes: angle (easy), horizon (intermediate), acro (for acrobat, or ‘dam! that’s hard!‘). So you can ease into flying and not crash as much just starting out. Plus, by designing and printing my own parts, when I do crash and break something, its probably a part I can print.
I went the DIY route and bought everything separately. I had no idea what I was really getting into. You can buy kits or pre-built and tested FPV racing drones (I love the FlightTest people), but you pay a premium, and I’m cheap. And after building 2 3D Printers with instructions in a language I’m still trying to learn, I figured it can’t be much more difficult.
Turns out, unless you have some friends, its pretty hard. And those on the FPV Racers Shanghai group are extremely nice and helpful. Two guys, ‘A’ and ‘O’, live nearby and have helped immensely in my endeavor.
Still, there is a lot to it. And at times I thought it would never end. Got pretty frustrated and almost gave up a couple of times. Everything, it seems, needs to be purchased separately and assembled to some extent:
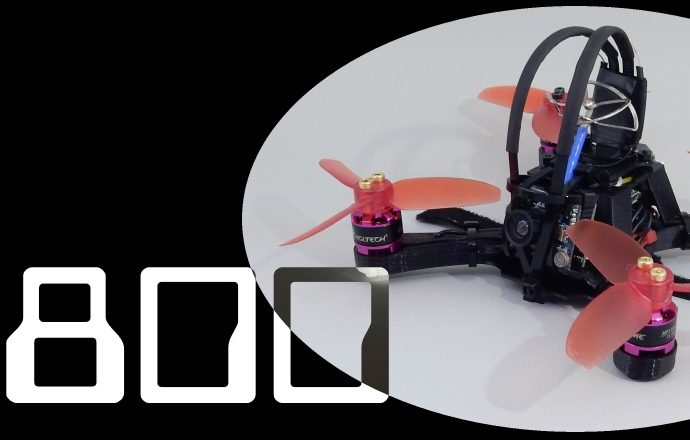
- The Frame : I printed mine in TPU with a PETG skeleton for flexibility with some rigidity. I call it the T-800. Its only about 10cm on a side.
- The Motors : you need 4 for a quad (duh) and they should be sized for your frame, controller board, and battery
- Props : Propellers for the motors. They come in packs of 2 (clockwise and anti-clockwise) as you always need to have an even number of motors and props with half counter-rotating to the other. Otherwise your drone will just spin around on itself
- Prop screws : Yup, gotta buy these separately. Don’t know why
- ESC : Electronic Speed Controllers. One for each motor. Or you can find a controller board with these built in, but it makes wiring and soldering a little harder. Of course, I went for the built-in ESCs on the controller board.
- Controller Board w/ESCs : This contains the brains of your quad along with all the solder points for everything to connect to it. Yes, solder points. Virtually NO built-in connectors save for the USB port for programming and firmware uploading
- Camera : If you’re gonna fly FPV (First Person View), you need a camera so you can see where you are going. Some, like mine, come with built-in antennas, others need to be bought separately
- Beeper and Lights : The beeper helps tell you what state the quad is in: ready, armed, disarmed, battery low, or lost (you can turn this last one on with your RC controller when you crash so it easier to find). The lights help you determine which way its headed if your flying in direct view mode (not FPV), and they also help in finding the drone in a crash
- Batteries : These need to be sized to the drone, motors and controller board, though there is a lot of leeway for mixing and matching. Bigger batteries can give you longer flight times (up to a point) at the expense of weight and maneuverability. Too big and powerful, and they can burn out your motors. And these are LiPo, not Li-Ion, they have greater capacity and longer stable voltages through use, but they are volatile and can explode if over taxed or shorted. What fun.
- Batter Bags : Yup, special bags for transportation, storage and charging of the Lipo batteries. They’re advertised as ‘Explosion proof’, but what they really mean is fire-smothering. Just in case they decide to go critical for no good reason.
- Remote Controller : This is the unit you hold in your hand to control/fly your drone. I opted for the Taranis Q X7 as the suggestion of Aldy, and it is awesome. Very flexible and configurable for controlling just about any type of RC device: cars, boats, planes, quads, etc. And customization with screens, images, sounds and switch functions. Still trying to find a sweet British voice for mine…
- Nuts, Bolts, Standoffs : All the stuff to put it together needs to be bought separately. Only the controller board came with a few standoffs.
- Charger : You need a special charger for LiPo’s, and I got a ISDT q6 Plus as recommended. The menus were in Chinese, but with a little help from a friend I was able to unlock it to English so I could read it. Yeah, my Chinese still sucks…
- Power Supply : The Charger is just a charger, it comes with no power. You need to supply one. The input range is very board so just about anything that supplies 7-32V up to 300W will work. Luckily I had a PC Power brick rated at 12V and 10A (120W) so I used that.
- Power Supply Adapter : This odd little charger uses XT60 plugs for power in and out. I’d never seen them before, so I had to find a barrel plug to XT60 plug adapter cable to make this work
- Charging Board : The Charger, although very versatile, can only charge one battery at a time. That kinda sucks. So you need a charging board so you can charge up to 6 batteries at a time. Luckily, the charging board can be bought with the correct cables to fit the charger. And the nice part about most charging boards is you can daisy-chain them. So just keep adding boards to charge more batteries at a time – up to the maximum rating of the charger.
- Battery Charging Adapter Cables : For min-drones, like mine, the batteries come with JST connectors (never seen those before either), but the Charger and Charging board use XT60 connectors. So you need to buy 6 adapter cables for XT60 to JST. I bought 7. Unfortunately, 2 of the cables were wired backward and we didn’t initially notice and almost blew up a battery!
- Goggles (not Googles) : If you want to fly FPV, you need a good FPV headset (goggles). This is by far the single most expensive purchase of the whole assembly. I have not bought one yet. ‘A’ recommended that I get good enough to fly FPV and try different ones from the group before buying. Lots of people like FatShark brand, but I find they sit too close to my eyes. I dunno. Probably need to try them again.
So yeah, that about it. Lots of stuff. Still didn’t mention a soldering iron, solder, electrical tape, heat-shrink tape, sticky rubber pads and zip ties to tie it all together.
You can go the pre-made, pre-packages, BnF (Bind and Fly) route. Its more expensive, but it gets you in the air faster. But if anything breaks from a crash, you either set to buy spare parts (if they make ’em) or buy a whole new drone. At least with DIY, you can either fix it, reprint it, or buy just the piece that broke. Longer learning curve, but a learning nonetheless. And I like learning new stuff!