So, I’ve been printing with my JG Aurora A3 printer for a just about a year now, and I’ve accumulated a few tips and tricks along the way that I thought I’d share. On top of that, some people over on Thingiverse (Anyone installed an auto-leveler?) actually read my first post on the Aurora A3(!) so I thought I’d give an update.
Most of these are pretty generic to 3D Printers, so let’s just jump right in:
PrintBite
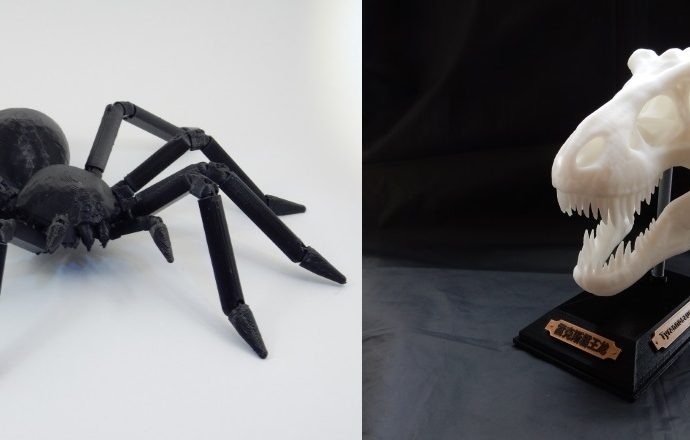
Toss Blue Tape out – Please! After buying and using PrintBite for the past 4 months, I will Never go back to blue tape. The prints stick like glue when printing, and when the bed cools back down, they just slide right off! PETG sometimes takes a very minor effort. The underside is glassy smooth, which it very important if that is to be the top-side of the print. Corners can still curl up a bit on some narrower prints, but not like with Blue Tape. And you never have to scrape, scream, or hammer them off again.
I know its more expensive than other solutions out there, and perhaps some of them work just as well and cost less. But PrintBite is very tough and has yet to show any wear – and I print almost daily.
Lastly, use pure Acetone to occasionally clean it. Don’t bother with window cleaner or dish washing liquid – they just leave nasty residue behind that won’t let the prints stick.
Insulate the Hot-End
With PLA and PETG, it’s best to cool down the filament as soon as it’s extruded from the nozzle so that overhangs don’t curl, finishes are smooth, and corners sharp. So a good fan and duct to the nozzle tip is essential. However, too much air-flow and the nozzle becomes cooler than the hot-end temperature is showing because there is a lot of reflection of the air off the bed and the part back up onto the hot-end and nozzle. This just makes the heater work harder and can require you to increase the hot-end temperature to compensate. Which, in turn, can lead to burning the filament and lots of stringing.
The solution I found was to use Plumber’s tape (or P.T.F.E). It’s basically Teflon. Wrap your hot-end and the nozzle (except the tapered tip) in it with at least ten layers. I just cut the PTFE into short strips to make it easier to manage and wrapped it up like a mummy. Your Hot-End heating core with thank you.
You will find that you can lower your Hot-End temperatures, it heats up faster and the temperatures are more stable throughout the print. You can also increase the cooling fan speed to really get a good effect on the filament in preventing stringing, overhang droops and produce sharper corners.
Insulated HotEnd is a GOOD IDEA !!!!
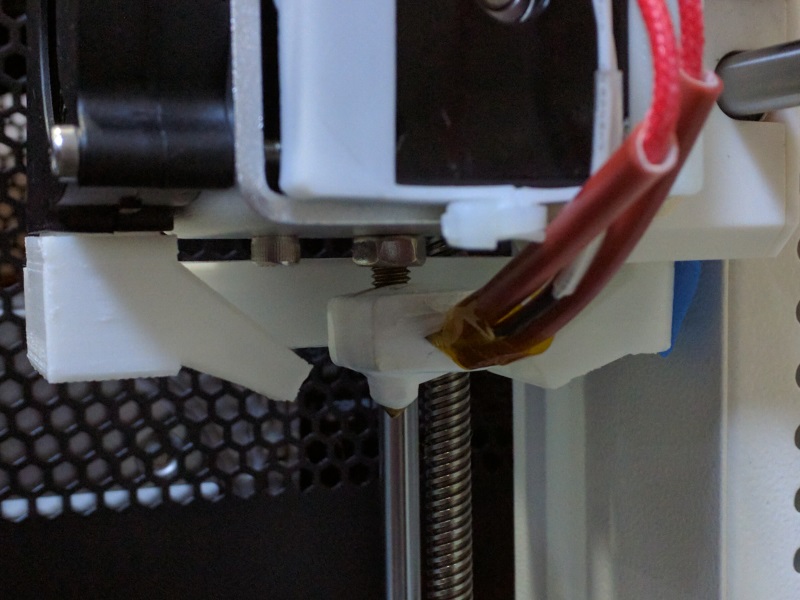
Silicon Wrapped Hot-End
Insulate the Heated Bed
Another part that benefits from a little insulation is the Heated Bed. The bed on the Aurora A3 is only 12v and getting it to 100c is basically impossible. Getting it to the proper temperature can also take a long time, and with PrintBite, they recommend (and I agree), that you need to increase your bed temperature by 10-15c. That puts my bed to 75c in the winter time (the apartment is kept around 16c)
Getting to that target of 75c would take 10 mins from a cold start, and afterwards the heater was on almost constantly trying to maintain it.
Go to IKEA (they are every where) and get a pack of these cork place mats: AVSKILD. Cut to size and place it under, and up against, the heater bed. I used Kapton tape to tape the edges to the bed.
Now it takes around 8 mins to fully heat (2 min savings) and the heater is not constantly on anymore. I know this is saving me some money in electricity and the bed should be more uniformly heated.
Insulate your 3D Printers Heated Bed
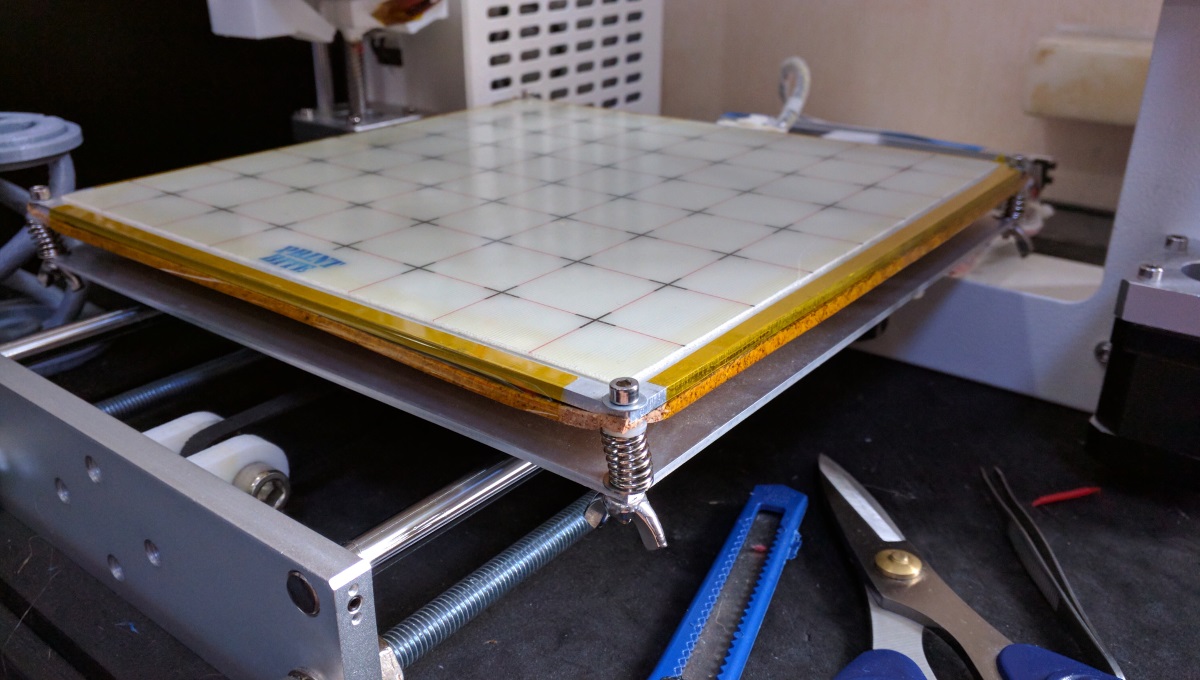
PrintBite with Cork Insulated Bed
Oil Your Filament
A good Hot-End/Extruder combination is a must for any printer to produce good prints, and the MK8 on the Aurora is a good quality set. Still, it can clog, and its a major pain to clear it out when that happens.
I’ve been oiling my filament for that very reason and have yet to experience a clog. Every 10 hours of printing or so, I dip a q-tip into Rapeseed Oil (Canola Oil), squeeze off the excess, and lightly wipe down a 10-20cm section of filament going into the hot-end while its printing. This doesn’t appear to affect the print quality or adhesion of the layers, but you will get some oily build-up on the hot-end and nozzle after a while. That’ a whole lot easier to clean up than a clogged hot-end!
I do this for both PLA and PETG.
Preventing and Fixing Jams – Tips & Tricks
Printing with PETG
PETG is strong, more heat resistant that PLA and can produce some really nice looking prints. But it has its drawbacks as well:
- It is very temperature sensitive – especially by color. Black likes to be printed hotter than any other color, and clear likes it cooler
- It’s stringy as hell! You need to fiddle with the travel speed, cooling fan, retraction distance and speed to get stringing under control and even then it will string really badly if a print needs a lot of retractions in a very short time (like on narrow pillars or fine lettering/details)
- The first layer need to be printed HOT on PrintBite (or it just won’t bite). I print the first layer at the high-end of the recommended temperature setting for the spool of PETG and then slowly lower it over the next few layers to the proper temperature for adhesion and reduced stringiness.
- It makes a total mess of your nozzle! PETG like to be printed slower than PLA so that it will stick to the previous layer. Even then, it really wants to curl back up and adhere to the nozzle. This can leave little blobs and strings on your print (that are usually easy to clean up), but the nozzle will be completely covered in it. Yuk.
PETG has its uses, and I like printing structural things with it as its more flexible, yet stronger and durable than PLA (and not as toxic as ABS), but man it can be just a pain to print.
How to Succeed When Printing in PETG
Printing with PLA
I’ll probably never print with ABS. I think PETG is a safer/cleaner/better filament. But for everyday printing that’s easy, reliable, clean, and non-toxic (probably), nothing beats PLA.
I like the fact that its relatively bio-degradable (decades) and apposed to ABS (centuries) and very easy to clean up. All the colors (13+) I have of PLA print very well at the exact same settings: hot-end/bed temperature, speed, cooling, supports, etc. So there is not much to fiddle with when changing colors – even mid print.
Again, with PrintBite, I found heating the filament up for the first layer produces better bed adhesion. But unlike PETG, I only have to go up by 5c for a good effect.
How to Succeed When Printing in PLA
Reverse Bowden (Filament Guide)
So, you’ve got your spool of filament mounted on the top of your printer or off to the side and its printing away all happy like. Then the print head whips over to the side and yanks on the filament, so the spool over-spins and excess filament unwinds from the spool. The head whips back to other side and the excess filament falls off the spool and wraps around the spool holder.
Now you have a problem: All that tugging on the spool can cause missed feeds on the extruder resulting in empty lines and holes in your print. Filament falling off the spool and wrapping around the spool holder only makes this worse and can jam, either breaking the filament (failed print) or pull the spool off the holder (very failed print!)
Get a Bowden Filament Guide (you don’t need a different hot-end or extruder) and mount it to your spool holder (there are items on Thingiverse for this) and run the tube to your extruder. The filament feeds through the tube to the extruder and is now always a constant length and distance. Now, no matter where, or how fast, the print head moves, the filament feeds out of the spool at a constant, easy, rate. The tube keeps up the slack and keeps the distances the same. No more miss-feeds, gaps or holes in your print, and no more filament spilling out of the spool.
You prints, and printer, will thank you.
Summer v. Winter
As you have probably already summarized, 3D Printing is a very temperature sensitive process. If you indoor temperatures vary widely between summer and winter, like mine do, you may need to adjust your printing temperatures with the seasons.
In the summer, my apartment is around 26c and in the winter its around 15c. To compensate, I’ve had to increase the bed temperatures by 5c and decrease the nozzle cooling fan speed anywhere from 25%-50%.
If I don’t do these things, prints don’t stick as well to the bed and layers don’t adhere properly.
Another alternative is to build a box with a fan & filter and use that to help regulate the printing temperature no matter what the room temp is.
Maintenance
There are a few things you need to do from time to time to keep your printer in tip-top shape.
- Clean the Print Bed: I hope you’re using PrintBite (you’ll thank me for it). To clean it, just use a cotton ball with a little Acetone on it and wipe down the bed. I usually do this before a very large, long running print to ensure it won’t have any adhesion issues, and after I’ve printed a number of times and things don’t seem to be sticking as well.
- Clean the Nozzle: It’s better to do this when its hot – but be careful! Heat the nozzle up to standard printing temperatures and let the filament ooze out. Wipe off the nozzle down towards the tip with a cloth, cotton ball or q-tip. You can use Acetone here as well to help get the really sticky stuff off (like PETG). This is really important to do when changing colors (especially when going from dark to light colors) as you can get color bleeds in your print as the old crap oozes off while printing.
- Level the Print Bed: Again, I do this before really large, long running prints to ensure there are no issues in adhesion: there is nothing worse then a print coming off after 20+ hours of printing! I also do this after moving the printer for whatever reason, printing a number of prints, or when I notice things are sticking as well as they should. PrintBite is great, but it can’t fix an unlevel bed.
- Oil the guide rods: I do this every month or two, or when I notice its getting dry and noisy. Also, if I have a big order (rarely), I’ll re-oil the rods. The Aurora A3 came with its own oil bottle. I just wipe the rods down with a dry cloth and then use a q-tip soaked in oil to wipe them all down again (I use q-tips a lot). Dry guide rods can cause jerky movements resulting in missteps, misaligned layers and blobs.
- Check your belts: They should all have a little buzz to them when you pluck them. If not, they need to be tightened. Use a belt tension-er (available on thingiverse) or disassembly and re-string them if necessary. Loose belts can cause midaligned layers, blobing and overall poor quality prints.
Lastly, and unfortunately, wires and fray and come loose and connectors can fail. Get a good quality low-power soldering iron and practice up on your soldering skills. You might need them.
Selling My Services
So, I’ve got a 3DHubs site where I sell my 3D Printing Services. It’s mainland China only, so I don’t do any overseas shipping. Sorry.
I started it just as a way to try to fund my 3D Printing Addiction. After four months, I’ve only had 10 completed orders. One big problem is that 3dHubs uses Google for a lot of its services (mapping, analytics, captcha, etc) all of which are (*fart*) blocked. So very few people will wait the interminable time it takes for those services to time-out and the page to load.
Another problem is that about every other order or quote request is complete B.S. Either people can’t read and don’t see that I only deal in China, or they think CN is the abbreviation for Canada, or they think 3D Printers print in Stone (seriously), or they are just drunk as hell and trying to waste my time and never pay.
Those 10 completed orders have all been highly satisfied and my ratings are 5-star, but the orders just are not coming in like I’d like. I’ve looked around to see if there are any other 3D Printing services to join in China, but I’ve not found any.
I’ll stick with it for a while and see if things improve.
Cura v. Craftware v. Simplify3D
I’ve used 3 different Slicers thus far and have some pretty solid opinions on them. They are my opinions, only, and reflect my personal experiences with each. It’s not gospel and your results may vary.
Craftware
First, lets get this one out of the way: Its Crapware:
- Yes, its got a really flashy user interface, but its setup/process and layout are non-intuitive and don’t follow any OS application design guidelines whatsoever. So the learning curve is steep.
- It goes to great lengths to show you individual print lines in the slicing view, but fails horribly at showing the correct spacing and thickness. You end up looking at the layers and seeing multiple layers though gaps between each line underneath. This leads to thinking that the print is going to have gaps between the lines, holes, gaps between layers, etc. This is wrong, but it makes it impossible to determine real issues with the print where there really are holes, gaps, etc – because it all looks that way!
- The slicer preview is slow as hell. I get maybe one screen update every 10 seconds when trying to rotate around an object in the Slicing view. You need a massive gaming PC to get any decent frame rate. So looking for issues in the print (before printing it) it basically impossible.
- Slicing options have nice visual feedback/help on many of the options like Number of Shells/Layers, Layer thickness, etc. But its incomplete.
- It slices very fast, but the quality of the gcode produced is not as good as the other programs I’ve used.
- Has development stopped? It was in ‘Beta’ for about 2 years, and then v1.14 (not beta) was released in May 2015 with no further updates since. Yet its still buggy and laggy and produces poor quality gcode.
- Their User-feedback forum is hostile. I was Beta testing their versions last year and whenever I’d report an issue, bug, or concern, at least one troll on there would jump all over me for complaining about it: “It’s BETA! Don’t you understand?” was their cry. Finally I responded that as a beta tester, I was just doing my job to report and fix this issues to improve the software, but because of this Troll, I finally gave up and told them to just shove their CrapWare where the sun doesn’t shine, and left.
Cura 2
I love Cura. It is by far the best free, open-source slicer on the market. But why they version it as ‘2’, when the old version was already up to ’15’, I’ll never understand. It’s just confusing. Anywho:
- It’s fast, even though it doesn’t take advantage of multi-core processors. Slicing is fast. Viewing is fast.
- gcode generation is top-quality. It produces high-quality gcode reliably.
- The user interface is logical and follows OS applications standards very nicely, so the learning curve is low and easy to understand.
- It is extremely flexible! You can quickly switch between Simple and Expert modes and have dozens and dozens of slicing options to tweak to get the best possible print.
- It is constantly being updated and improved. New stable releases and beta releases are regularly produced and made available to everyone. Although their version numbering can make things confusing: Cura 2.3.0 (beta) v. Cura 2.3.0. Beta releases should always have different version numbers than releases.
- Their User Forum is top-notch! Everyone is extremely friendly (even me!) and very helpful. Their developers frequent the forums and so see your feedback/issues/suggestions first-hand and quite often respond directly.
- Open Source – For The Win! (that’s all that needs to be said)
- However, they don’t handle updates very well: Settings and customizations do not migrate well between versions. This means you usually have to blow away most all of your setting and start over when installing a new version. And you can’t have two versions Cura 2 on your machine at the same time (without jumping through some hoops to do so). So Beta testing one version while doing production with a stable release is near impossible.
- There is no line-level details in their layer/slicing view. It would be really nice to be able to see all the lines drawn and head movements layer by layer like you can in Simplify3D and Craftware. If/when this is introduced, I hope it doesn’t suck like Craftware.
- Another drawback in Cura is that every time you make any change in any setting, it re-slices the object. For large objects, this can take a while and can really slow you down. Sometimes, it can lock-up during a re-slice if you don’t wait to make another change.
Like I said, Cura is constantly being updated and improved. Many issues from last year have already been fixed. These I’ve stated above are being looked at by the developers and may be fixed in a future release.
Simplify3D
Dear Lord, that software is expensive!! But so far, its been money well spent.
I have a 3DHub, where I offer 3d Printing Services. So I needed a professional quality slicer that was stable and produced consistent quality results that were 100% reproducible. Simplify3d (S3D) fit those requirements.
- Customized Support: I love being able to place supports exactly where I want them. I love being able to move/rotate/scale/duplicate an object and have all its supports move/rotate/scale/duplicate with it.
- Factory Files: Once I’ve finished setting up a print, I can save its ‘Factory File’ to disk and everything about it is saved with it: The model, supports, all the settings, the printer info, everything. If I ever need to go back and make some changes, even if I’ve changed setting in S3D, I can just load in the Factory File and get back to exactly what I had.
- Line/Layer Level details: like Craftware, S3D allows you to see line level details in the Slicer view. You can seed details based on print head speed, retractions, travels, etc.. But unlike Craftware, it is fast and accurate. Line placement, width, thickness are exactly as it will be printed. If you see a hole or gap, there will be one in your print. No guessing. And the screen updates are much better than Craftware. This is essential for producing high-quality prints the very first time.
- Although there are not as many options to tweak as in Cura, the major ones are there and I’ve not yet found a need for most of the ones missing.
- Per Object Settings: While Cura now does this as well, its better integrated into S3D. You can print multiple, different objects at the same time, each one having different settings: Layer heights, supports, speeds, infills, etc.
- Per Layer Settings: Each object on the print bed can also have different settings based on layer height. Say you want a section to be stronger/denser than the others, or you want to print at a different layer height for speed or detail. You can do that easily in S3D.
- However: Their updates are not as frequent as Cura, and their developers do not appear to frequent their forums like Cura.
If Simplify3D sits around too long, Cura will overtake them and then nobody will buy their software.
Finally, the one major enhancement I would just LOVE to see in a slicer is Automatic Variable layer heights (VariSlice). At this time, this is the holy-grail of 3d printing: To be able to automatically slice and print an object and different layer heights depending on vertical details. This means faster print speeds with no loss in details when needed.
Is it Safe?
The Short Answer: Nobody really knows.
I’ve seen the three top Filament types (PLA, PETG, ABS) evaluated, to some extent, for safety and the consensus is that PLA is safest followed by PETG and then ABS being pretty bad: toxic fumes, high PM2.5 particle counts, etc. But a really in-depth chemical and particle evaluation does not appear to exists – even for these three filament types.
Add to this mix all the different chemicals filament manufacturers add in for colors, flexibility, durability, shrinkage, warping, heat resistance, and even those top three turn into hundreds of variations that have not been tested, nor have any EPA safety guidelines.
On top of all this are the constant additions of exotic types: Carbon fiber, Nylon, flexible, glow-in-the-dark, HIPS, PVA, etc., etc. etc. None of which I can find any safety testing done on while being heated and printed.
So, is it safe? Erring on the side of caution says “Probably Not” – at least when printing.
So, what do you do? Something I hope becomes more commonplace with 3D Printers in 2017: Enclose the printer in a box with a HEPA and Charcoal filter. There are only a very few printers today that do this. One manufacturer, TierTime makes two: Up Mini 2, and Up Box Plus. This are really nice printers with high prices to match. But at least they are addressing some of the safety concerns.
So this is what I plan on doing: building a plexiglass box around my Aurora A3 and attaching a HEPA/Charcoal filer on it. Not only will this give the printer box negative pressure so all the gases will be filtered, but it will also help me regulate the printing environment temperatures over the warm summer and cold winter months with adjustable fan speeds. Even PLA & PETG printing can benefit from a stable temperature environment.
If/when I do this, I’ll post the process on this site.
30 Types of 3D Printer Filament – Guide & Comparison Chart
OctoPrint
Would you believe: I destroyed an SD Card with all the inserts and extractions running gcode files between my PC and my 3d Printer? Yup. It’s true. Plus I was wearing out SD Card readers constantly.
The solution was OctoPrint on the Raspberry Pi – or OctoPi for short.
I got an Raspberry Pi 3 with the built-in Wifi adapter, loaded up the official OctoPi distribution and plugged it right into my Aurora A3’s main board. Now to print, I just go to octopi.local on my browser, upload and print it! I don’t even have to get off my fat-ass to walk an SD Card over.
The OctoPi software is not perfect, it’s still kinda buggy as it doesn’t always start up with the Pi. But if that happens, I just SSH into it and reboot it. But I’ve never had a failed print from it.
You can monitor the temperatures, print times, time remaining, and view the printer (if you have a compatible USB or Pi Cam attached) from just about any Web Browser. They just added (half-assed) folder support, which is a step in the right direction. Now you can at least organize multi-part prints that you print regularly into production folders. But there doesn’t appear to be any way to move files between folders – you must upload them directly to the destination folder – and that’s it.
I even wired in the Pi’s power to the Aurora A3 PSU using a 12v to 5v stepdown converter. So now when I turn on the Printer, the Pi powers up as well.
It’s a nice enhancement to the printer. And a lot of newer 3D Printers now have wireless printing abilities (some even using OctoPi built right in!)
In Conclusion
Wow! This has been a long post.
3D Printing is still in its infancy and pretty much a tinker’s toy – even on the high-end. Over the years it will mature and the industry will come under various regulations (including safety). Printers will be easier to use and maintain and software will be more stable. Who knows, maybe one day there will be a 3D printer in every home just like TVs are today.
But as always, there will be new things to learn, ideas to share and enhancements to try. Its fun, interesting, and sometimes frustrating – but all things worth doing are…
Cheers.